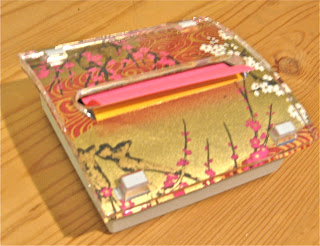
So anyway, I just started a job that requires me to work from home and, with the inevitable restructuring of my office space that comes with such a new job (oh trust me, there'll be more on that in here later), has come the need for copious amounts of office supplies including, my friend and yours, Post-its.
 I was out shopping for said supplies when I found the following: a Post-it holder (I've seen them in the $11-15 range at office supply stores. I picked up mine for a bit under $11 at WalMart).
Of course, it was cursed with a hideous flower print theme, but the box noted something every vaguely crafty person loves to see: the unit had removable faceplates.
Yes, removable faceplates. If something has changeable faceplates, chances are you can easily make your own faceplate yourself... and I just happened to have some amazing chiyogami paper that was dying to be made into something pretty.
 Chiyogami paper is a Japanese paper whose pattern is made by layer after layer of silkscreening. The stuff is just gorgeous and has a lot of uses in decorating if the prints suit your fancy (it'll be coming up in several future projects here). It's reasonably easy to order online, however I happen to be lucky and live decently near a store that sells it: The Paper Place. If you're in the Toronto area I highly recommend a stop at this store. If not, they ship to Canada, the US, and the UK. The paper runs a bit on the expensive side at around $16 for a 24x36 inch sheet, but it goes a lot longer than you'd think and the quality is superb. I estimated I used about $0.50 worth, but that might even be a bit high.
If chiyogami isn't your thing or it's too hard for you to get, you can use any sort of decorative paper such as wrapping paper or scrapbooking paper; just make sure it's a smaller print and it's something you love. It doesn't hurt if it's also paper that'll match a Post-it note colour.
To get started, take the Post-it holder apart... okay, let's be honest here, yank the damn thing apart. It's awkward and frustrating, but only for a few minutes, I promise.
Then you want to take the vile, disgusting faceplate off. Post-it makes these holders in several prints... all of them range from mostly off-putting to truly tragic. Thankfully this one won't be staying around for long.
Use the soon-to-be-rejected faceplate as a stencil and trace its shape onto the back of your paper. I probably should have turned my faceplate over so as to spare my eyes from the horror.
Now that you've got the faceplate shape traced, resist the urge to immediately burn the old faceplate; you may need it later unfortunately. Now cut out the new faceplate (you may want an X-acto knife for the inner portions).

 Now it's time to put the holder back together. If you have nice, thick paper just pop the new faceplate in place and attach the transparent cover. If your paper is a bit thinner, like mine, you may need the old faceplate at this point. Put the old faceplate in right side up, and then overlay the new faceplate on top of it before you add the cover. This will give your new paper the bracing it needs to smoothly align with the clear cover's curves. If your paper is thin and the old cover shows through (or you just can't bear the thought of the old cover being within 50 feet of you) you can always trace a second faceplate out of white card stock and use that instead.
In about 5 minutes you've gone from freakish to fab. I've got a lot of chiyogami left, so I'll be customizing quite a few more supplies in the future in hopes of eventually having a fully matched office set (but not too matchy-matchy... that ends up creepy and/or artificial).
Final project cost to me: $11
Time to complete project: About 5 minutes


No comments:
Post a Comment