The Globe and Mail just featured an article called "What I Learned From Wearing 6 Items For a Month". Apparently, as a means of showing that you can actually make do with way less clothing than the average North American keeps in their closet, the writer challenged herself to only wear 6 different pieces of clothing (not including accessories and undergarments) for 30 days.
It's an interesting read for anyone who either has a closet stuffed with clothing or looks in their closet and, regardless of how much stuff is in there, always feels like they have nothing to wear. There's a great message in it that these types of people need to hear: when you're buying clothing, buy strategically.
It's not hard to keep your clothing budget low by only buying things that are super cheap, but that can be the easiest way to a pile of clothing that isn't flattering, is of low quality, doesn't match, and/or you don't love to wear. The trickier proposition, but the one that brings the most joy (and the least clutter) in the end, is to buy less things, but make sure the things that you buy fit beautifully, are made well so they'll last, make you giddy to wear, and, most importantly, all match each other.
Seriously, the matching thing is the secret to a budget wardrobe. If everything you own can pretty much be worn with everything else you own, then you've got an obscene amount of outfit combinations that all look great. Take a look at the six pieces of clothing picked for the Globe and Mail experiment. Everything in that capsule wardrobe can be worn together in a flattering way.
So why doesn't everyone do this? Well, there's a lot of reasons, but mostly because it's not the easiest thing to do. It's only in the last year or so that I've felt I've gotten remotely competent at this approach to fashion. It's hard, but it's pretty damn satisfying once you get it to work.
I figured an affordable, non-cluttered wardrobe that you love to wear fits in with the more expanded scope of this blog, so over the next few months I'm going to be writing posts about some of the tips I've used to work on building a functional, pared down wardrobe... it's a process, so we'll be taking it one small step at a time.
Saturday, February 19, 2011
Saturday, February 12, 2011
Mini Project: Customized Tape Dispenser / Cost: $
More often than not, tape dispensers are boring and utilitarian. Dull as dirt. And when they're not... well, they tend towards the idiotic.
So, for every one one kinda stylish tape dispenser like this:
You get a thousand plain black hunks of plastic and at least one monstrosity. or example:
So, in short, it's tough to get a tape dispenser that doesn't put you to sleep or make you want to pour acid on your eyes just so you can't see the horror anymore.
So what's a style-minded, budget focused girl (or guy) to do? Tweak an existing tape dispenser on the cheap. Yeah, it won't be fancy, but it'll at least match the rest of your office stuff and look different from anything you can buy.
Basically you're going to get a plain, old plastic tape dispenser... yeah, the kind you normally throw out when you're done with the roll of tape.
 This'll run you, what, maybe $3 if you spurge for the name brand stuff... less if you go for something from a dollar store (but really, why not treat yourself to the nice stuff... you're worth it!). What's key is that you get the tape that comes in a clear plastic dispenser and that you make sure the plastic is reasonably strong and that the tape cutting edge looks like it's there for the long haul. It'd suck if you do this project and the thing breaks... okay, it's not the end of the world, but maybe a waste of about 10 minutes total. But really, why would you want to do this twice? Are you bored? If you are, come over to my house and do my laundry then, rather than make up busy projects for yourself.
Okay, now that you've obtained an appropriately sturdy clear plastic tape dispenser (and have possibly done my laundry), pop the tape and the label out. This is surprisingly easy to do on a decent roll of tape (if it breaks now, at least you saved yourself from a waste of time. Now go out and buy nicer tape!) and it's the reason you can make what's supposed to be a temporary tape dispenser more permanent.

So put the tape roll off to the side and then toss out the paper label (or, alternately, scrap the rest of this project and then follow the steps from the Custom Post-it Holder project to make a matching tape holder. Look at you, thinking outside the box!).
Now you're going to need some decent quality paint and a paintbrush small enough to paint a tape dispenser, but large enough not to make the process take all year. I used a craft brush and some acrylic paint I'd had since... well, I'd had it for long enough not to remember when I picked it up. The point here is not that I'm forgetful, the point is you don't need fancy paint.
Now, the trick that keeps this project looking slick and professional is that you're not going to paint the outside of the dispenser; you're going to paint the inside. This makes the spiffy effect of a color with a thick layer of gloss over top of it. It looks much more expensive than just a plain old Scotch tape dispenser, that's for sure. You'll to need to be rather precise so that the paint is on the inside and ONLY the inside. If it gets on the outside the whole effect is lost and it just looks sloppy and accidental rather than like something you paid exorbitant amounts of money for. Of course, you didn't pay obscene amount of money, but why let people know that? Try masking off the edges with tape (I know you have some) if you don't feel you've got the coordination to keep the paint where it needs to be. Goodness knows I needed to.
Once you get the painting done, chances are it'll look like ass. This is because you suck at painting. Okay, it's not... it's because a lot of acrylic paint is somewhat translucent, especially if you use a lighter color like the bronze I used here. You'll need to let your first coat dry and then do several more layers of paint (the lighter/cheaper your paint, the more layers you're likely to need. If you used something like wall paint, though, you might be fine with just one coat). Don't get ahead of yourself and not give the thing time to really dry. You'll just end up scratching the semi-wet paint coat at some point and mucking up your hard work. Take some time. I did this project in between other stuff, so I likely waited a full day between coats. You probably don't have to wait that long, but play it on the safe side. Paint often looks dryer than it actually is.
After a number of paint layers you'll notice that the color has become opaque (AKA: "it's not letting light through it anymore" for those of you who skipped art class). Once this happens and the last layer is dry, you're ready to reassemble it.
Pop the tape roll back in (make sure the sticky side of the tape end is pointing down or the damn thing won't work) and call it a day. You've now got a nicely coordinated dispenser that doesn't look like a stupid plastic shoe. Congrats. That means you're one step ahead of anyone who actually owns the stiletto dispenser, and that's gotta feel good.
Remember, it's easy to find the plain tape rolls at office supply store, so just stock up on those when the original roll runs out (this is why I told you to splurge on the nice tape dispenser... so it'll last).
 |
| Seriously, Scotch? This was the best you could come up with? I'm embarrassed for both of us. |
 | |
| Reasonably clever. If you don't understand the joke, then you've just made me feel old. |
 |
| What the f%$k?! This makes me want to give up on humanity completely. |
So what's a style-minded, budget focused girl (or guy) to do? Tweak an existing tape dispenser on the cheap. Yeah, it won't be fancy, but it'll at least match the rest of your office stuff and look different from anything you can buy.
Basically you're going to get a plain, old plastic tape dispenser... yeah, the kind you normally throw out when you're done with the roll of tape.

Okay, now that you've obtained an appropriately sturdy clear plastic tape dispenser (and have possibly done my laundry), pop the tape and the label out. This is surprisingly easy to do on a decent roll of tape (if it breaks now, at least you saved yourself from a waste of time. Now go out and buy nicer tape!) and it's the reason you can make what's supposed to be a temporary tape dispenser more permanent.

So put the tape roll off to the side and then toss out the paper label (or, alternately, scrap the rest of this project and then follow the steps from the Custom Post-it Holder project to make a matching tape holder. Look at you, thinking outside the box!).
 |
| All joking aside, a small flat craft brush is a good choice for this project. |
 |
| Yup. I taped the center part. |
 |
| See... I suck at painting too! |
After a number of paint layers you'll notice that the color has become opaque (AKA: "it's not letting light through it anymore" for those of you who skipped art class). Once this happens and the last layer is dry, you're ready to reassemble it.
 |
| Many... MANY layers of bronze paint. It was stupidly transparent |
 | |
| A tape dispenser in the wild... well, in the wilds of my old desk, that is. |
Final project cost to me: $3
Time to complete project: About 10-15 minutes
Time to complete project: About 10-15 minutes
Wednesday, February 9, 2011
A refocusing of efforts
Hey there! Long time no see.
Where have I been? Well, in the time since I last posted I finished grad school, took a contract job over an hour and a half away from where I lived, moved to an apartment closer to work, and then got a permanent position where I was contracting.
All and all, this didn't leave me a lot of time to work on home improvement projects. However, now that I've got less driving to do and a new apartment to pretty up, I'm back to blogging. However, I still don't have the project time I used to back when I was a lowly grad student. Hence a bit of rebranding for the blog. Rather than keeping it as the decorating-focused "My Cheap Ass Home", I've moved to the broader "My Cheap Ass Life".
So what does this change mean? Well, I'll still be posting about bringing my bland apartment up to snuff for as low a cost as possible, but in between projects (AKA: when, in the past, I didn't have any content to post here) I'll also be writing about other ways I enjoy doing and acquiring the things I love without going broke in the process. Basically, I'll be talking about how to work with the seemingly impossible problem of having expensive taste but a limited budget.
Maybe you're like me and are paying off debt (thanks student loans! *smirk*), maybe you've got a limited income, maybe you're saving for big ticket items (like retirement, a home, children, or say a wedding), or maybe you just don't like paying more than you have to for the things you want and need. Whatever the reason, I promise you that there are loads of ways to have and do the things you want affordably, and this blog will help you discover some of the paths to getting there.
So, to sum it up, there'll more content coming out at a MUCH more regular pace. Or, to make it even simpler, yeah, this blog isn't dead. Hooray!
Saturday, May 1, 2010
Project # 2: Semikolon-esque Magazine Files / Cost: $$
I have a horrible lust for all things Semikolon.

If you've never seen their products before and like color then SEEK THESE OFFICE SUPPLIES OUT! Seriously, this company gets how to make sleek office supples in a rainbow of color options in a way no one else seems to. Unfortunately their products aren't particularily cheap. They aren't ridiculous, but they're in a mid-range that's a little bit out of my range right now, at least if I want to do my entire home office in their line.
My plan is to slowly but surely pick up a few pieces here and there (in the magenta and grass green colors if you were wondering) and eventually have a home office that's all Semikolon or things that match Semikolon... in, like, 10 years or so because really... this stuff is frustratingly priced. It's priced low enough that I can actually buy it, but high enough that I can't buy much of it at any time. Ah well, I should just be happy it exists and just eventually resort to petty crime so I can afford the overpriced secretary they make.
 I was in need of some magazine files, but the Semikolon ones were just a bit too steep for me at the time. Thankfully I bumped into some extremely cheap wooden magazine files at Ikea: Knuff. They were on sale for $3.99 each, so I snatched up three. In retrospect I should have bought more since my Ikea no loger carries these exact ones, but what can you do? It's hard to go to Ikea and not spend eight times what you meant to... I was trying to be vaguely fiscally responsible.
Wood is great because you can paint it quickly without a lot of drama. I figured it wouldn't be too hard to make these puppies look like the Semikolon magazine files I longed for.
 The first step was to prime the files. Untreated wood is exceptionally thirsty. If you try to use acrylic paint directly on wood you'll find that you'll have to use tons of it because the wood soaks up a large amount of the water in the paint quickly, so it won't spread very far before you have to reload your paintbrush. The best way to combat this is to do a primer coat. Primer paint is significantly cheaper than regular paint, so you can use a lot without spending a lot. It also creates a smooth surface that your paint will adhere well to. In this case I used gesso, a primer used on canvas, to prime my boxes. Why gesso? Because it's a cheap primer and I had a bunch already sitting in a box wanting something to do. You can pick up a reasonably-sized jar of gesso at art and craft supply stores. For projects like this don't bother with fancy gesso; you just need the most basic one you can find. Liquitex Basics brand gesso is fine, or any other gesso around the $5-10 price point. A small container should be enough. I used maybe 1/4th of the container you can see in the picture on these files.
Prime the entire file, inside and out (unless you're planning to leave parts unfinished. Mask those parts off with tape before you prime if you're going this route). I started by doing the bottoms, waiting for them to dry, and then priming everything else. If you end up with any dried gesso lumps (which I did since my gesso was old and a bit dehydrated) you can use a fine grade piece of sandpaper to lightly sand them out.
 Once the priming is done now you can break out the paint. Primer is not an attractive finish, so I highly recommend that you paint overtop of it, even if you're planning to stay the same color as the primer. While paint primer has a nicer color than car primer (ewww... primer grey and brown... I shudder just thinking of the cars that drive around painted in just primer), it still has an unfortunate flat finish that doesn't have the richness of a proper acrylic paint. Take the extra time and paint over every speck of it.
For this project I wanted to simulate the white borders of the Semikolon products on my files, so I took white acrylic paint and painted all of the edges a bit beyond where I thought the bands of white would be (having some paint overlap is a good thing). Preciseness was unnecessary at this point since I was going to be masking off things in the next coat. Expensive paint was unnecessary too... I just used cheap Liquitex Basics paint. You're not painting a masterpiece... you just need a basic color with good performance, which the Liquitex Basics brand provides.
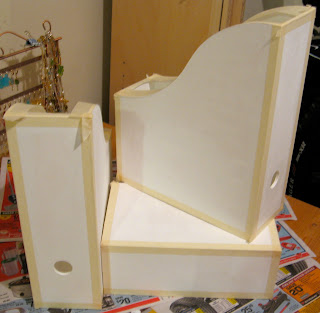
After I painted the white edges I then masked them off with masking tape. Rather than using a ruler and precisely masking off a set measurement I just used thinner masking tape and, by eye, placed it so half the tape was on one side, and the other half was on the other. It's not that hard really... people are somewhat decent at cutting things in half by eye.
When you're placing the masking tape (or painter's tape if you have it) make sure you press it down on the file very firmly. You don't want it to accidentally peel off while you're painting the main color. Don't worry, even if you press it down firmly it'll still peel off without pulling up your paint.
 Now that your white corners are masked off, get your main color ready. If you can purchase your main color premixed either in a tube from an art supply store or mini pail from a home renovation store do this. It's way easier than trying to guesstimate how much you'll need and premixing it or, even worse, trying to remix the same color again after you've run out mid-project (which I had to do on this project... I made it work, but it SUCKED to have to so). I didn't realize this when I was doing this project, but at places like Home Depot you can buy small containers of their wall paint fr about $5 mixed to any of the paint chips they have. This is supposed to be for trying out a color on your wall or something, but there's no reason you can't use it on a project like this to get the exact color you want. Depending on how dark your color is you may need to do two coats (darker usually equals more coats to get the color even).
 When your paint is partially dry you can peel off the masking tape. If you're using house paint this isn't as crucial, but art paint sometimes doesn't peel off cleanly if you take off the masking tape once it's completely dry. The part attached to whatever you painted can sometimes stay attached to what's on the tape, so when you pull the tape off it makes the edge ragged. Make any small paint touchups you need to.
After the paint fully dries you're done. Semikolon-look, but MUCH cheaper (especially if you already have the paint and supplies)

If you've never seen their products before and like color then SEEK THESE OFFICE SUPPLIES OUT! Seriously, this company gets how to make sleek office supples in a rainbow of color options in a way no one else seems to. Unfortunately their products aren't particularily cheap. They aren't ridiculous, but they're in a mid-range that's a little bit out of my range right now, at least if I want to do my entire home office in their line.
My plan is to slowly but surely pick up a few pieces here and there (in the magenta and grass green colors if you were wondering) and eventually have a home office that's all Semikolon or things that match Semikolon... in, like, 10 years or so because really... this stuff is frustratingly priced. It's priced low enough that I can actually buy it, but high enough that I can't buy much of it at any time. Ah well, I should just be happy it exists and just eventually resort to petty crime so I can afford the overpriced secretary they make.

Wood is great because you can paint it quickly without a lot of drama. I figured it wouldn't be too hard to make these puppies look like the Semikolon magazine files I longed for.
 The first step was to prime the files. Untreated wood is exceptionally thirsty. If you try to use acrylic paint directly on wood you'll find that you'll have to use tons of it because the wood soaks up a large amount of the water in the paint quickly, so it won't spread very far before you have to reload your paintbrush. The best way to combat this is to do a primer coat. Primer paint is significantly cheaper than regular paint, so you can use a lot without spending a lot. It also creates a smooth surface that your paint will adhere well to. In this case I used gesso, a primer used on canvas, to prime my boxes. Why gesso? Because it's a cheap primer and I had a bunch already sitting in a box wanting something to do. You can pick up a reasonably-sized jar of gesso at art and craft supply stores. For projects like this don't bother with fancy gesso; you just need the most basic one you can find. Liquitex Basics brand gesso is fine, or any other gesso around the $5-10 price point. A small container should be enough. I used maybe 1/4th of the container you can see in the picture on these files.
Prime the entire file, inside and out (unless you're planning to leave parts unfinished. Mask those parts off with tape before you prime if you're going this route). I started by doing the bottoms, waiting for them to dry, and then priming everything else. If you end up with any dried gesso lumps (which I did since my gesso was old and a bit dehydrated) you can use a fine grade piece of sandpaper to lightly sand them out.

For this project I wanted to simulate the white borders of the Semikolon products on my files, so I took white acrylic paint and painted all of the edges a bit beyond where I thought the bands of white would be (having some paint overlap is a good thing). Preciseness was unnecessary at this point since I was going to be masking off things in the next coat. Expensive paint was unnecessary too... I just used cheap Liquitex Basics paint. You're not painting a masterpiece... you just need a basic color with good performance, which the Liquitex Basics brand provides.

After I painted the white edges I then masked them off with masking tape. Rather than using a ruler and precisely masking off a set measurement I just used thinner masking tape and, by eye, placed it so half the tape was on one side, and the other half was on the other. It's not that hard really... people are somewhat decent at cutting things in half by eye.
When you're placing the masking tape (or painter's tape if you have it) make sure you press it down on the file very firmly. You don't want it to accidentally peel off while you're painting the main color. Don't worry, even if you press it down firmly it'll still peel off without pulling up your paint.


After the paint fully dries you're done. Semikolon-look, but MUCH cheaper (especially if you already have the paint and supplies)
Final project cost to me: $12
Time to complete project: About 2 hours spaced over many small painting sessions
Time to complete project: About 2 hours spaced over many small painting sessions
Friday, April 23, 2010
Website Link: Top 5 Cheap Furniture Basics
 I've bought a wide range of cheap furniture of, over the long-term, varying quality. The very worst? An over the toilet bathroom organizer from Zellers that was terrible to put together (I got blisters from it! Ouch!). The best? Probably my Billy bookcases from Ikea.
I'm a firm believer that stores like Ikea have, amidst the cheap stuff that'll do the trick for a year or two that you'll toss out when you move, a few top notch inexpensive items that'll actually hold up.
Apartment Therapy released a set of recommendations awhile back on the top 5 pieces of cheap furniture and I couldn't agree more with them (well, except for the part where they left out my beloved Billy bookcases that is). The commenters also left a long list of additional good finds. The article is a great list of cheaper stuff that you can rely on to last (unlike the aforementioned POS bathroom organizer... damn you Zellers!).
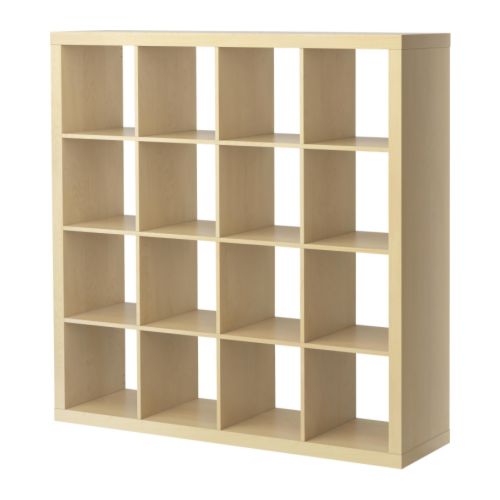
I'd like to add my deep love for Ikea's Expedit unit for a reason Apartment Therapy didn't mention: it is VERY VERY light. That fact may not matter to some of you, but I'm a massive weakling, so it's nice to know I have furniture in the house that I can actually move myself. A few years ago I picked a horrid cheaper Expedit-like shelving unit that Ikea made for about 10 seconds and then smartly discontinued, and I was completely unable to lift the box it came in myself. Expedit: it's not just a sheving unit; it's also good for people with no upper body strength!
The Expedit units have a number of great storage box and shelf options available, both from Ikea and from other companies as well. I personally have these Kassett boxes in green for storing my craft supplies and they both look attractive and do their job well.
If you want a cheap table to inflict your creative whims on I'd also recommend Ikea's Lack tables (yet another super-light friend for the strength-challenged). Their finish doesn't hold up the best over time (I have a few water-related mini-warps in the finish on mine), but they're one of the most delightfully hackable tables out there and are cheap enough that you won't be too upset if your hack doesn't go as well as planed. They're a good practice ground for hacking furniture, as this article notes. The Home Cheap Home book I reviewed awhile back also had some beautiful ideas for more artsy (and a bit harder) Lack table alterations.
Monday, March 29, 2010
Website Link: Knock Off Wood
I'll get back to posting projects of my own soon (I've actually done a few... I just haven't had the time to write the blog entries yet), but for now I'm sharing a link to another blog: Knock Off Wood.
The site gives you all the measurements, supplies lists, and instructions to easily create your own versions of popular furniture pieces. Say you want some Billy bookcases from Ikea but want to make sure they'll be made of something stronger than particle board... they've got some pretty darn simple instructions for that. How about a version of Ikea's Expedit or West Elm's Rolling Storage? They've got that too.
Because the blog outlines simple do-it-yourself furniture that means the vast majority of it is in a modern style, so if your home says more "antique" than "clean and simple lines", than this might not be the perfect site for you. However, if you've got a few tools and have always wanted higher-end modern furniture for around the cost of the particle board versions, this site is a godsend.
Wednesday, March 17, 2010
Link: How to sew your own duvet cover

Friday, February 5, 2010
General news: My Google Reader addiction
I've recently gotten pretty frothy about using Google Reader... yes, I know, I'm super-late to the game, especially since I myself have been blogging (both here on Blogger as well as Livejournal) since what seems like the dawn of time (or, more accurately, at least the last ten years).
Okay... so I admit lameness on only jumping on the Google Reader bandwagon recently. I hope my complete enthusiasm makes up for my pathetic lateness.
I've been using Google Reader for a number of reasons, but one of the the main ones is for inspiration for projects for this site. I'm sampling home design blogs like a hungry kid nibbling on samples at Sam's Club/Costco and you, dear readers, can benefit from my bloated excess of reading. Yes, I'll slog through the garbage and pull out the stuff worth your time and limited attention span.
First, I'm planning to add any blogs I'm in love with to the already existing blogs listing on the right... same with any great sites (especially those you can buy fabulous home design products from) too.
Second, feel free to peruse my Google Reader Shared Items list. I'll be focusing on sharing the best inspiration and project articles I find, some of which will likely be used as the basis of projects I complete for this site.
Enjoy!
Tuesday, February 2, 2010
Link: How to remove a stripped screw without an extractor
I am afeared I will at some point will need this detailed article from Apartment Therapy on how to get a stripped screw out... and so may you, so here's the link.
Monday, February 1, 2010
Mini Project #2: Headphone Hook / Cost: $ to $$
Uggg! Last month's race to finish the first draft of my Masters thesis was brutal. I didn't even have the time to do any major home projects last week. I did, however, manage to do a tiny one.

I attend online classes that require headphones with a mike. For the past 9 months I've just hung them off of my computer screen... which is a tiny thing, but it's really just so ugly that it bugs me on a visual level in a way that has no real relation to the actual size of the decorating problem.
 What's a girl to do? I use the damn things so often it doesn't make sense to put them away, but they just get in the way all hanging off my screen all willy nilly.
Solution: cheap hook!

 I had this hook lying around the house... I think it came from Ikea for some ridiculously cheap price. Seriously, you can get these things dirt cheap from home repair stores and the like. If you feel like being fancy, try this slick Moen hook from Home Depot for $19.99. Or how about these puppies that are on sale... they respect my deep love of orange AND are on sale at three for $7.49.
 If you're cursed with some walls made of solid concrete like I am (they are a decorating NIGHTMARE I tell you!) you still have options. 3M (and likely some other companies too) makes hooks that use a super-strong adhesive to stick to your wall, making screwing or nailing the blasted things in thankfully unnecessary. I remember when they used to be ugly plastic nubs that could barely support any weight; now they're actually decent looking and can support some serious poundage (this hook supports up to 5 pounds of weight without falling off your wall, is a somewhat reasonable $12.98, and is snappy-looking to boot).
Lucky for me my computer sits against a regular wall, so all it took was a minute to nail the thing in and presto, more tidy headphone solution!

Now, this doesn't solve the problem of the headphones being ugly (that's a mod project I probably won't get around to until school is done, but at least it gets them out of the way in a manner that doesn't make me loopy.
Final project cost to me: $0 !!!
Time to complete project: About 1 minute
Subscribe to:
Posts (Atom)


