Tuesday, January 19, 2010

Mini Project #1: Custom Post-it holder / Cost: $$

I'll admit it: I have an unhealthy love of Post-it notes. Wherever I work you can always tell which desk is mine as it's the one the looks like it's completely held together with those little yellow stickies. I use them as reminders, for class notes, for organizing projects, for bookmarks... I just love the things. Really, if you have to have a vice, Post-its aren't a bad one.

So anyway, I just started a job that requires me to work from home and, with the inevitable restructuring of my office space that comes with such a new job (oh trust me, there'll be more on that in here later), has come the need for copious amounts of office supplies including, my friend and yours, Post-its.

I was out shopping for said supplies when I found the following: a Post-it holder (I've seen them in the $11-15 range at office supply stores. I picked up mine for a bit under $11 at WalMart).

Of course, it was cursed with a hideous flower print theme, but the box noted something every vaguely crafty person loves to see: the unit had removable faceplates.

Yes, removable faceplates. If something has changeable faceplates, chances are you can easily make your own faceplate yourself... and I just happened to have some amazing chiyogami paper that was dying to be made into something pretty.

Chiyogami paper is a Japanese paper whose pattern is made by layer after layer of silkscreening. The stuff is just gorgeous and has a lot of uses in decorating if the prints suit your fancy (it'll be coming up in several future projects here). It's reasonably easy to order online, however I happen to be lucky and live decently near a store that sells it: The Paper Place. If you're in the Toronto area I highly recommend a stop at this store. If not, they ship to Canada, the US, and the UK. The paper runs a bit on the expensive side at around $16 for a 24x36 inch sheet, but it goes a lot longer than you'd think and the quality is superb. I estimated I used about $0.50 worth, but that might even be a bit high.

If chiyogami isn't your thing or it's too hard for you to get, you can use any sort of decorative paper such as wrapping paper or scrapbooking paper; just make sure it's a smaller print and it's something you love. It doesn't hurt if it's also paper that'll match a Post-it note colour.

To get started, take the Post-it holder apart... okay, let's be honest here, yank the damn thing apart. It's awkward and frustrating, but only for a few minutes, I promise.


Then you want to take the vile, disgusting faceplate off. Post-it makes these holders in several prints... all of them range from mostly off-putting to truly tragic. Thankfully this one won't be staying around for long.

Use the soon-to-be-rejected faceplate as a stencil and trace its shape onto the back of your paper. I probably should have turned my faceplate over so as to spare my eyes from the horror.


Now that you've got the faceplate shape traced, resist the urge to immediately burn the old faceplate; you may need it later unfortunately. Now cut out the new faceplate (you may want an X-acto knife for the inner portions).
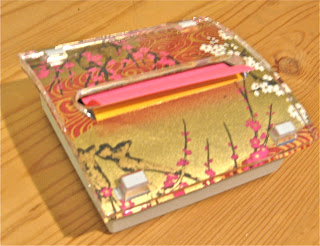

Now it's time to put the holder back together. If you have nice, thick paper just pop the new faceplate in place and attach the transparent cover. If your paper is a bit thinner, like mine, you may need the old faceplate at this point. Put the old faceplate in right side up, and then overlay the new faceplate on top of it before you add the cover. This will give your new paper the bracing it needs to smoothly align with the clear cover's curves. If your paper is thin and the old cover shows through (or you just can't bear the thought of the old cover being within 50 feet of you) you can always trace a second faceplate out of white card stock and use that instead.

In about 5 minutes you've gone from freakish to fab. I've got a lot of chiyogami left, so I'll be customizing quite a few more supplies in the future in hopes of eventually having a fully matched office set (but not too matchy-matchy... that ends up creepy and/or artificial).


Final project cost to me: $11
Time to complete project: About 5 minutes

Friday, January 15, 2010

Book recommendation: "Home Cheap Home" / Cost: $

So I originally wanted to call this blog My Home Cheap Home... and the name was available too. Turns out though that I accidentally borrowed the title from a book I had read just last month (yeah, I've got a short memory for those things I guess). I realized my mess up in time, the blog name changed, but the book is still excellent.

Home Cheap Home gathers tons of reasonable tips, suggestions, and projects for making your home stylish without having to go broke in the process. They're also projects and suggestions that almost anyone with some semblance of hand-eye coordination and ability to follow instructions should be able to pull off, so don't worry about needing to have big-time art skills to find the tips useful. The book goes for many smaller suggestions rather than just a few big projects, which I like because it means that no matter what your style is there'll be something in here that'll make reading the book worth your time.

I should note, though, that the authors of this book had a wide price range in mind when they decided to define what "cheap" meant to them. There are some suggestions for pieces to purchase that definitely wouldn't initially strike me as affordable. However, most of the pricey items are things intended to stay in your home for the long-term. It's not too terrible to think about spending, say, $600 on a table if the table is going to be with you for the rest of your days (and normally sells for way more than that to boot). I'm a big believer in spending more up front to spend less in the long run, so I'm letting Home Cheap Home slide on this a bit.

The book was put together by the editors of Budget Living Magazine, which was my favourite magazine back in the early 2000's. And, naturally, because I loved it with all my heart it of course went under. If you can find old copies of the magazine they've got great suggestions for making the best of a minimal budget (several of the features in this book are directly lifted from the magazine word for word).

The magazine is out of print... and guess what? So is this book (such is my fate). I borrowed my copy from the library. Want to take a peek through it? Check and see if your library has it (look, if my suburban library did there's a decent chance yours might too). Want your own copy (I know I do!)? Barring haunting your local flea markets and garage sales, try your country's version of Amazon. I found used copies, all under $10, on both the Canadian and American versions. Ebay has it too sometimes. Needless to say, it's not too hard to work around the out-of-print-ness.

Thursday, January 14, 2010

Project #1: Curtain closet doors / Cost: $$ to $$$ (depends on size of project)

Okay, so my boyfriend has been in this apartment for 3+ years. When he moved in he was missing the sliding closet doors that should have been on the hallway closets, but was promised they'd be installed shortly. As you can see below, the promised doors never arrived (despite my boyfriend placing MANY work orders for them since then with the ever-changing building management).


Clearly at some point we just gave up on the whole idea completely and let the closets just do their thing... which clearly was "be ugly."

We'd been meaning to start bugging the new building management about the issue again, but realized doors might cause a problem now that we had gotten accustomed to using the open closets for air drying laundry. Doors just wouldn't work anymore, but what we had looked cluttered and just plain ridiculous.

I had some fun green curtains from my last apartment (I love decorating with green... you should just get used to seeing it here a lot) that had never found a place in this home and were slowly deteriorating unloved in a drawer. I figured why not use them as makeshift doors?

First I tried putting it all together for "cheap as free" and used some hooks and picture hanging wire i had already to string the curtains across one of the closets. It was a bootleg solution at best; the wire sagged and one of the hooks got pulled out of the drywall when my boyfriend valiantly tried to force the wire to be more tight already. Clearly this was a project that needed a small amount of cash.

What ended up being a great solution was tension rods. They're usually used as a simple solution for putting up both window and shower curtains in spots where it would be hard/impossible to use more traditional rods with hook supports drilled into the wall. Tension rods have four great perks: they come in a variety of sizes, they're self-adjustible (so you only need a rough measurement of the area you need them to span to make them work), you can put them up and pull them down in under a minute with no damage to the walls, and (best of all for this blog) they're stupid cheap. I needed three tension rods (two for the 23" openings and another for the 54" one) and the grand total for all of them came to around $25.

The tension rods looked much more on purpose than the wire and I'm super happy about the punch of colour this project added to my hallway (as are, apparently, my cats).


Because I already had the curtains, my grand total for this project was the $25 for the tension rods. If I had to add in the curtains though, the project doesn't actually cost much more since I picked up the four curtain panels for $20 total on massive clearance at Linens and Things back in 2007 (they're half poly, half silk if you were wondering). If you keep your eyes out you can usually find curtains on sale at home or clearance stores like TJMaxx or HomeSense.  If you can't wait for a sale, do check out stores like Wal-Mart, Target, and Ikea for great low cost options. The nice thing about curtains is you can almost always find ones that look half decent in the cheap range, and since you don't need to block out out sun with these curtains you don't have to worry about finding ones with lining, which always adds to the price.


If you want to go one step further, you don't even need to pick up actual curtains. Get your hands on curtain rings with clips on them (like these Riktig rings from Ikea, which are a steal at $3.99 for 10) and then just clip up sheets or raw fabric that you like. If you use sheets you don't even need to sew hems; just adjust the sheet to the length you need, fold the excess over at the top of the sheet, and clip them at the fold.


Final project cost to me: $25
Time to complete project: Under 5 minutes (not including ironing the curtains, which bumps it up to about 20 minutes)

"My Cheap Ass Home" mission statement

Welcome!

I'm starting this blog partially as a way of sharing information ('cause that's the kind of dork I am: the sharing variety) and partially to get my arse in gear and actually get around to making my apartment vaguely livable and decorated with a minimal amount of cost and effort.

I've been living in the same apartment for a little over a year, but due to not being remotely emotionally invested in the place, as well as having very little spare income, I hadn't gotten around to decorating much. It's hard to get motivated to spend money on a home that I know I'll leave as soon as it makes financial sense. And so, despite actually liking having a nicely designed pad to call my own, the apartment languished in undecorated hell. Yup, mismatched furniture, some of which is inherited and ugly (the champion of this being my couches that look like they toddled out of Miami Vice), bare walls, and no cohesive style.

I've finally gotten to a breaking point though and decided to break down and make the place look like a real home rather than an apartment I just moved into last week. Of course, I have limitations. I'm in grad school and am only working part-time, so my budget is VERY limited. I'm also thinking long-term, so I don't want to invest in lots of improvements that I can't take with me when I move and/or would have to spend lots of money to remove when I finally can ditch this place for something more permanent... so no built-in shelves, wallpaper, or painting.

Of course, I've got some things on my side too. I've got a bit of extra time, a natural cheapskate manner, a background in art, several relatives and friends who do home repair who I can bug for advice, and (possibly best of all) an Ikea mere minutes away (have you seen the "As Is" sections at Ikea?! They're a bargain hunter's paradise if you know how to tweak furniture and find the few Ikea pieces that actually hold up over time).

To keep me motivated I decided to track my efforts with a blog because maybe other people reading about what I'm doing might help be be motivated to actually get going on some of the projects I've got brewing in my head and stop being so lazy.

So, over the next while I'll be posting the projects I'm working on (including pics, instructions, costs, and even the mistakes I made along the way so you can avoid them). I'll also be posting links to articles, books, and shops I've found that have either helped me in my efforts to make my place less sucky on the cheap and/or have inspired me.

Hopefully by the end of this journey I'll have an apartment that doesn't shame me every time I have visitors as well as a blog that helps people out of their own lame apartment fail.